PROCESSING AN ADJUSTMENT or ADDING HCPC CODE TO A PAID CLAIM
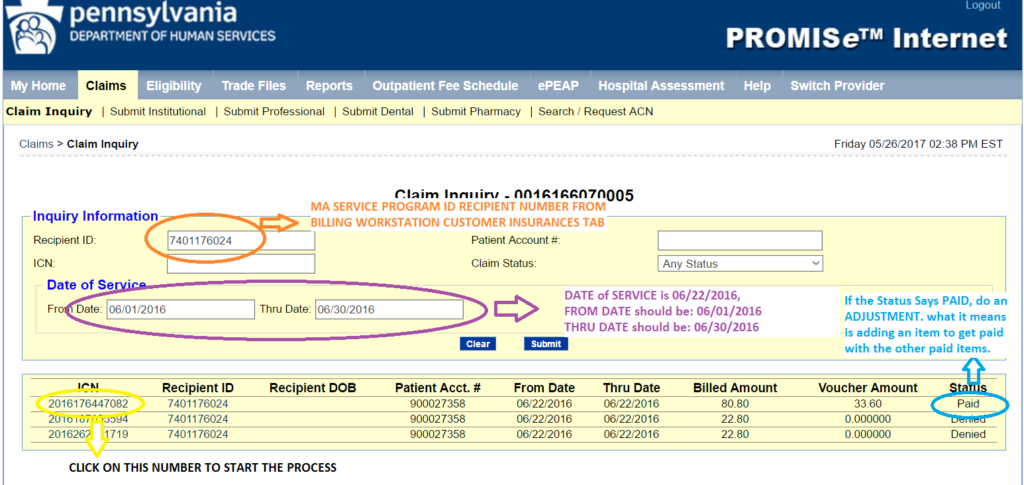
STEP 1: Copy and paste MA SERVICE PROGRAM ID RECP NO to RECIPIENT ID on CLAIM INQUIRY PAGE. Put in the Service Dates. Check all the Claim Reference Numbers including the denied ones and take note of the denial details. (this will be useful later on) and choose the paid one.Click on the Claim Reference Number to proceed to a new Window which is the PROFESSIONAL CLAIM PAGE/ SUBMIT PROFESSIONAL CLAIM PAGE.
IMAGE 1:
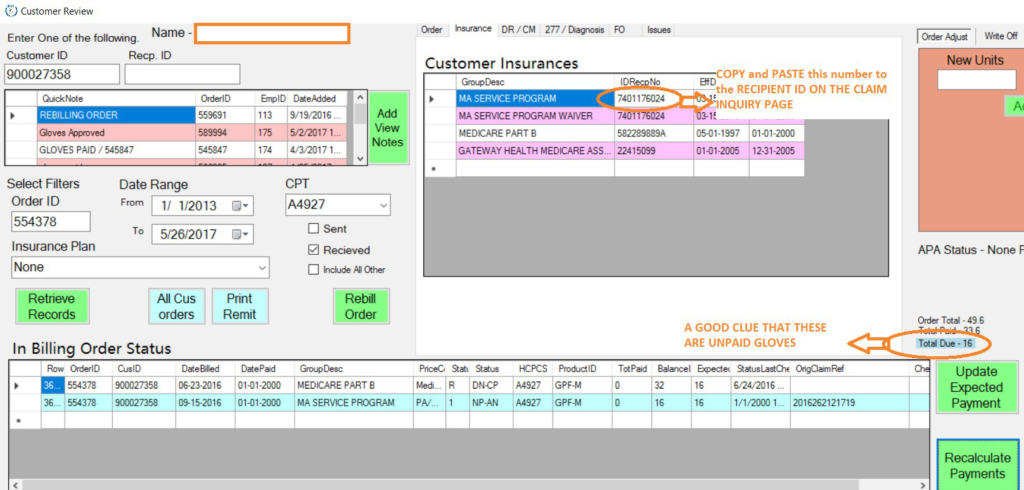
IMAGE 2:
STEP 2: Once you are on the Submit Professional Claim Page, scroll down the button of the page where you can find the Claim Status Information Portion. Copy the CLAIM REFERENCE NUMBER and Paste it on the ORIGINAL CLAIM # field under the BILLING INFORMATION PORTION of the page. Move or drag the cursor of the Claim Frequency to 7-Adjustment, to indicate that you are creating an adjustment.
IMAGE 1:
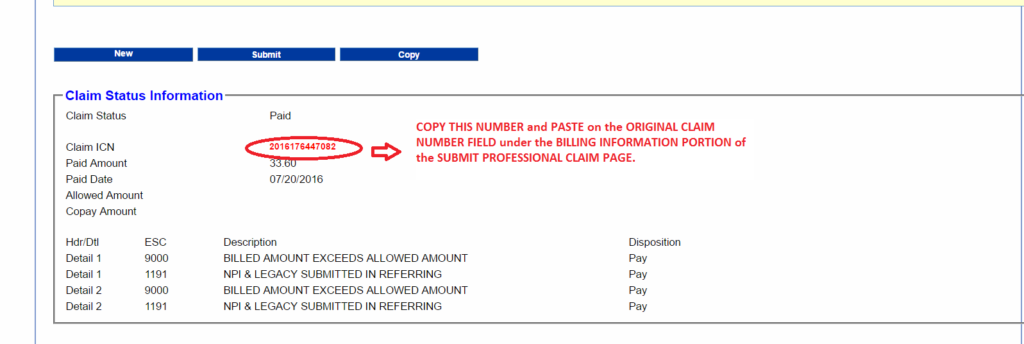
IMAGE 2:

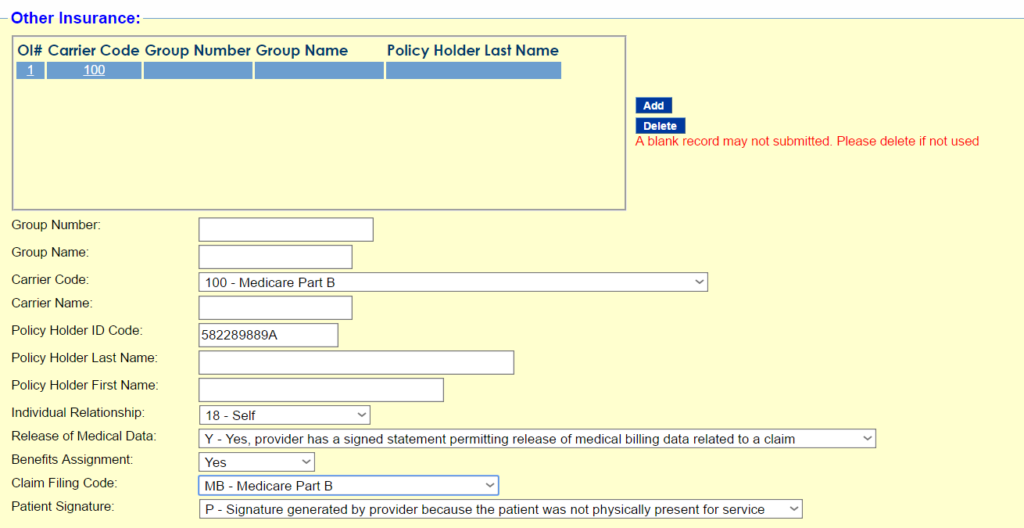
STEP 3: Scroll down to the OTHER INSURANCE PORTION of the page. Fill in all necessary information on OTHER INSURANCE SECTION: Click ADD, Do MEDICARE PART B, RECIPIENT ID NUMBER IN BILLING WORKSTATION under INSURANCE TAB. Make that all details are correct.
If the patient has another INSURANCE PROVIDER ( a COMMERCIAL INSURANCE), Click ADD After putting in the MEDICARE PART B. INFORMATION, Click Add, Then fill out the other details on the OTHER INSURANCE TAB.
IMAGE 1:
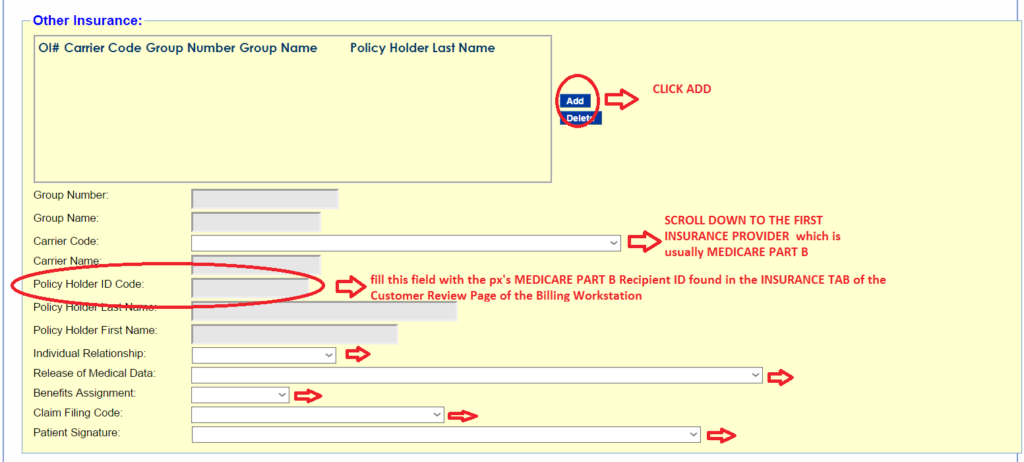
IMAGE 2:
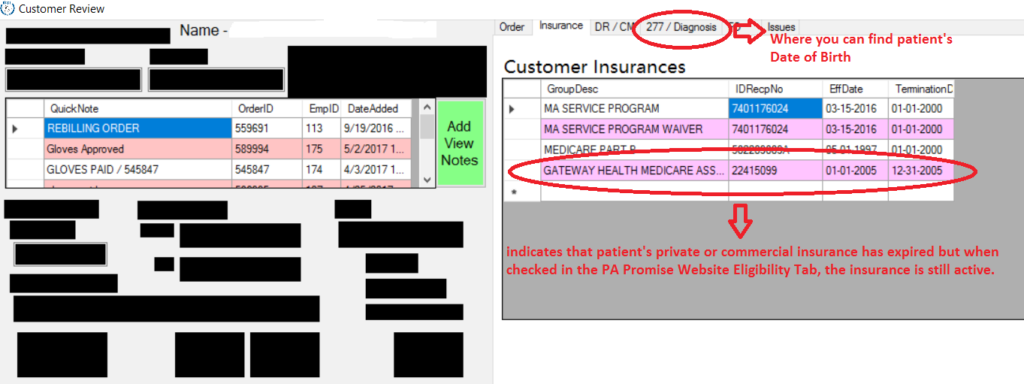
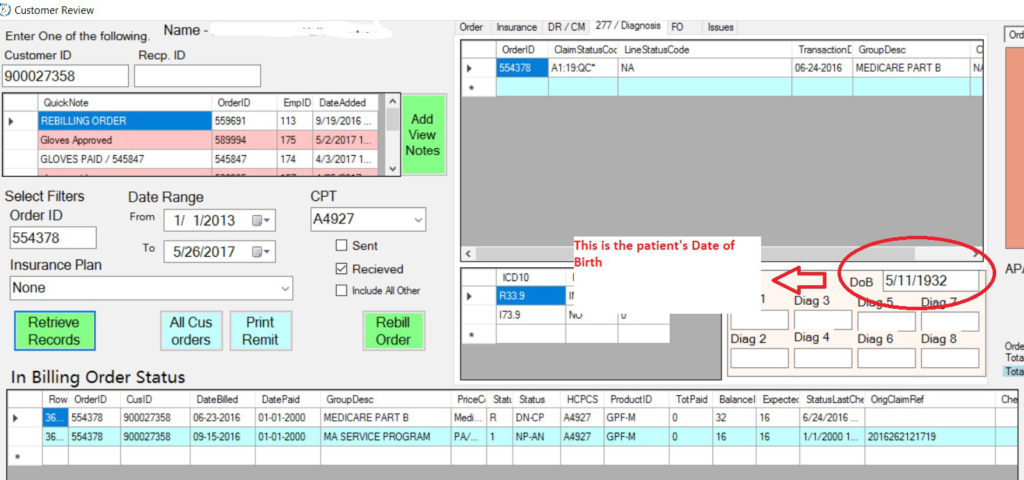
In this case, under the billing workstation, the patient only has Medicare Part B as a valid Insurance, and the patient’s previous commercial insurance has already expired. When you see something like this, it is best to check for the patient’s eligibility as a precaution so the adjusted claim won’t get denied. To check for the patient’s eligibility, right click on the eligibility tab of the PA-PROMISE Website, key in the MA SERVICE PROGRAM RECIPIENT ID of the patient and their Date of Birth. Select the Service Type Code 12-DME Durable Medical Equipment (you can find the patient’s date of birth on the 277/Diagnosis Tab on the Customer Review Page of the Billing Workstation) SEE IMAGES BELOW.
IMAGE 1:
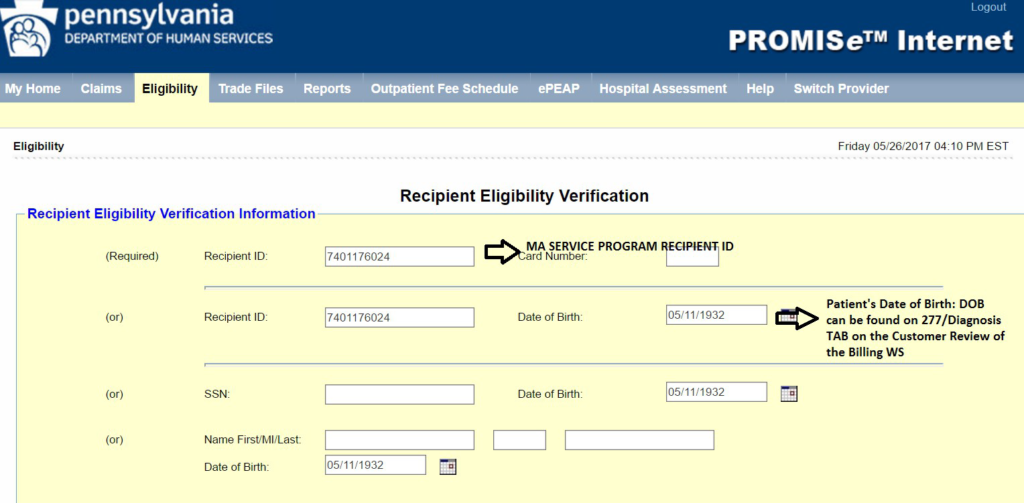
IMAGE 2:
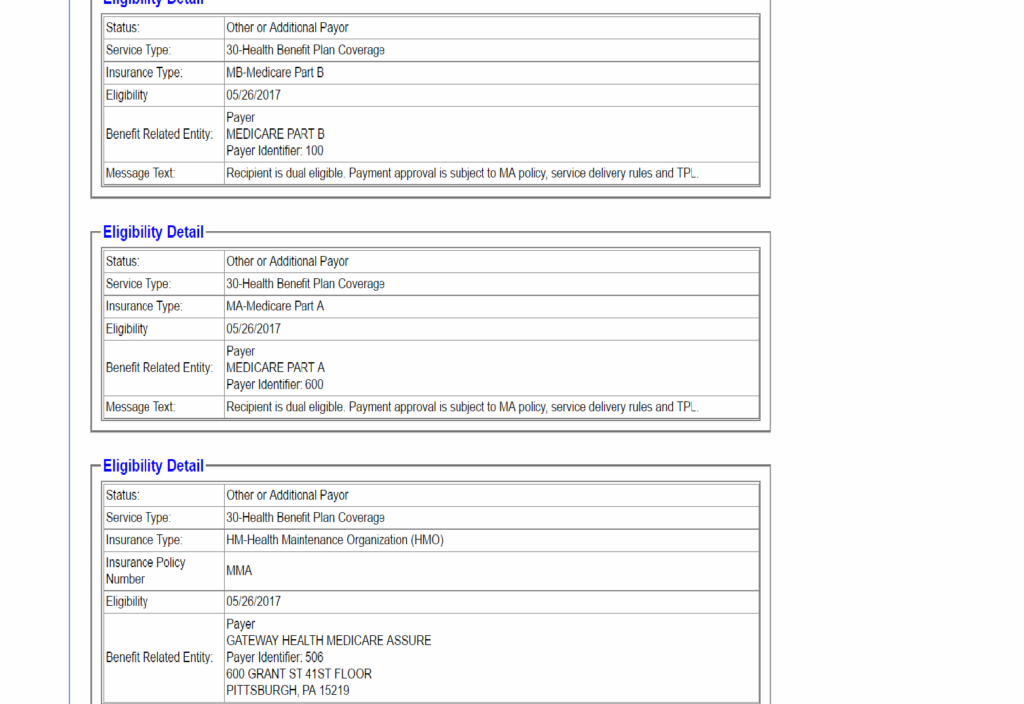
At the bottom part of the image 2, it shows that the patient has Private or Commercial Insurance under Gateway Health Medicare Assure.
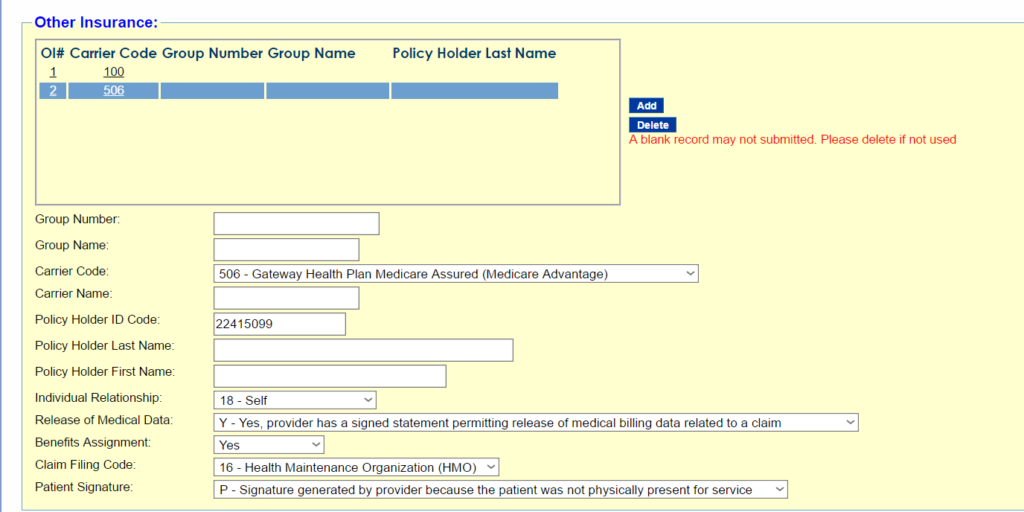
STEP 4: Since we were able to verify that the patient still has commercial or private insurance in the eligibility tab of the PA Promise Website, we need to add the other insurance to the list. On the OTHER INSURANCE PORTION of the Professional Claim Page, Click ADD, Do GATEWAY HEALTH MEDICARE. Copy GATEWAY HEALTH RECIPIENT ID NUMBER in BILLING WORKSTATION under INSURANCE TAB. Make sure that all details are correct.
SEE IMAGE BELOW
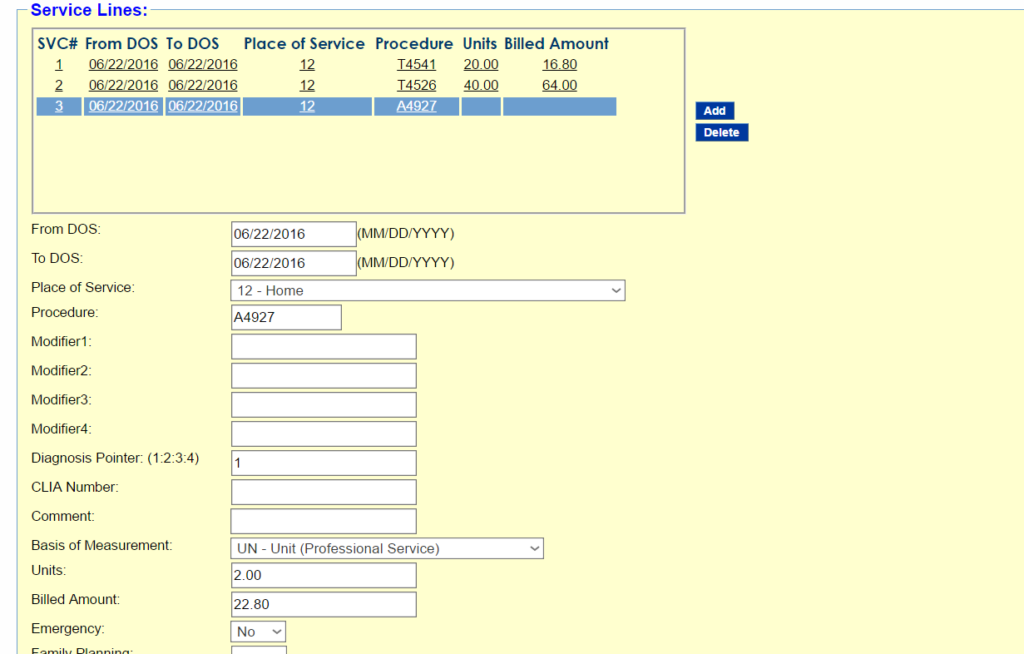
STEP 5: Fill out the SERVICE LINE PART OF THE CLAIM. From DOS -Date of SERVICE AND TO DOS: should be identical dates. PLACE OF SERVICE: 12-HOME, PROCEDURE: FILL IN THE CORRECT HCPC CODE, in this case A4927.
BE SURE TO FILL IN THE FOLLOWING FIELDS:
DIAGNOSIS POINTER: 1
BASIS of MEASUREMENT: UN
UNITS: 1 OR 2 – depending on how many boxes the px gets per month
BILLED AMOUNT: 1 BOX – $11.40/ 2 BOXES – $22.80
STEP 6: THE SERVICE ADJUSTMENT/S PORTION. Click on ADD ADJUSTMENT, this is the Blue Button on the left upper part of the Service Adjustment portion. Put in the Reason Code- 109 Claim not covered by this payer/contractor you must send the claim to the correct payer/contractor. Amount id $22.80, Adjustment Group Code id: CO-Contractual Obligations. Paid Date: See Diagram 2 of step 5 where to find paid date in the Customer Review Window. Paid Amount is zero because the claim id not paid. Carrier Code is the code of the first Insurance Provider in the other Insurance Portion of the Professional Claim.

When all fields are filled out properly, click on the SUBMIT BUTTON.
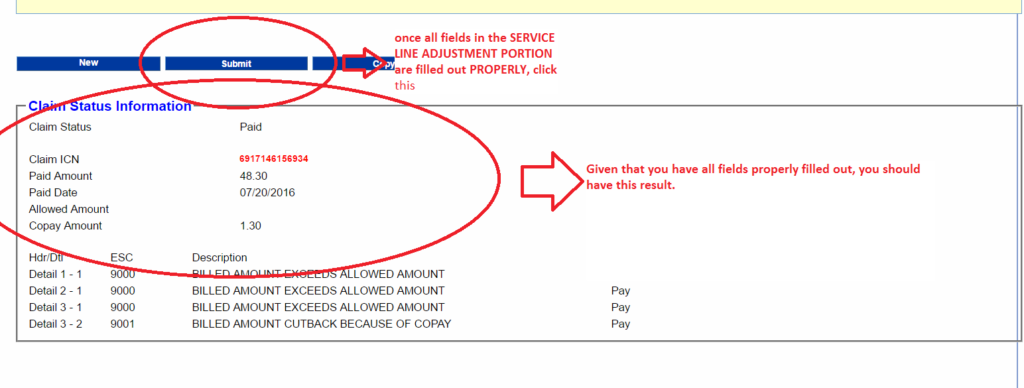
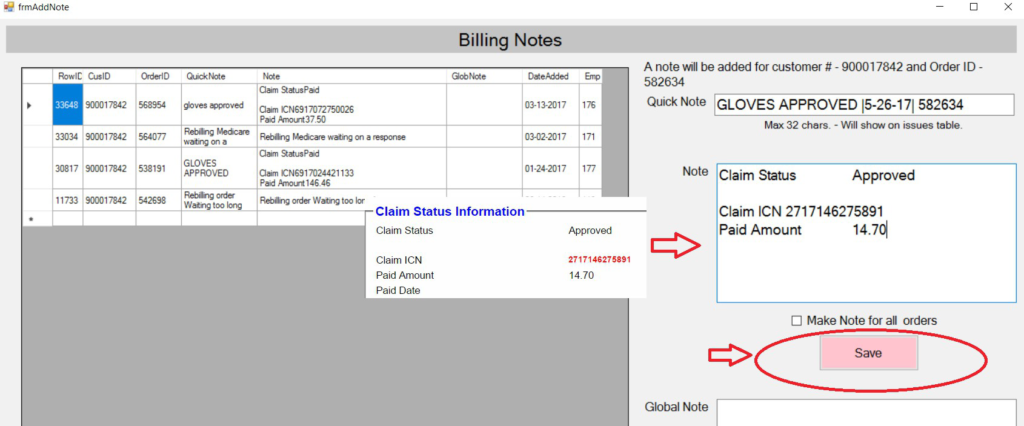
STEP 7: Copy and paste the notes on the CLAIM STATUS INFORMATION BOX. REPEAT the Last Step in the PROCESSING DENIED CLAIMS AS ORIGINAL for DETAILS.
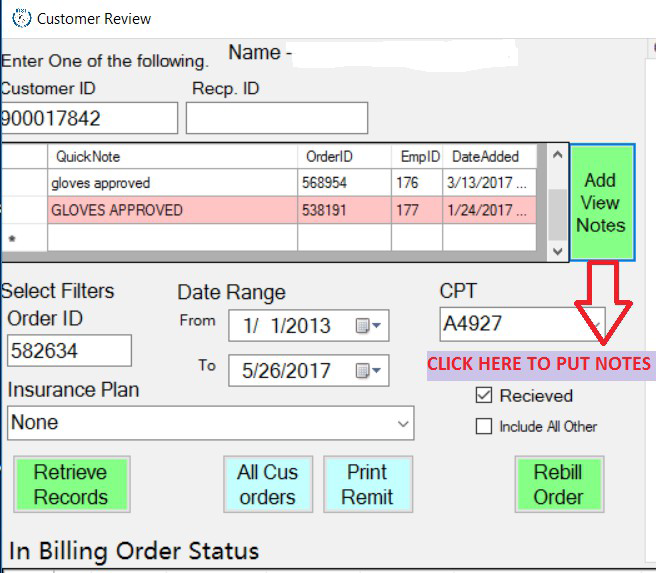
In the CUSTOMER REVIEW WINDOW, CLICK on the ADD VIEW NOTES BUTTON, it should prompt you to go to this page/window: ON THE QUICK NOTES WINDOW put in the CLAIM STATUS: GLOVES APPROVED [DATE PROCESSED] ORDER ID.
On the note window: copy paste the CLAIM STATUS, CLAIM ICN and PAID AMOUNT, then click on SAVE. Then you’re good to go.