SAVING THE CALL
To save the call tag, representatives need to do the following:
- Pull up the consumer in promise
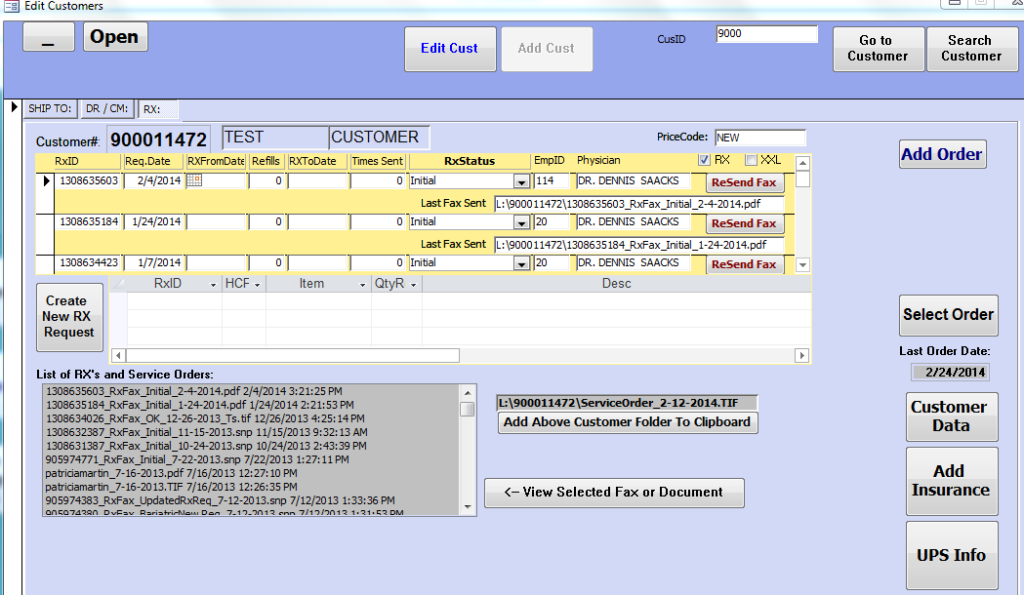
- Go in the RX tab
- Click on the “add Above Customer Folder to Clipboard” button (located in picture below)
- Please not: Once you click on it, the text will become black (confirms you selected it).

- After clicking on the button, representatives need to go back to the UPS confirmation page. Once back on the confirmation page, representatives need to click on the “View History” link located under where they first selected “Create a Return”.
- This section allows representatives to view any/all call tags that have been issued within the last 90 days.
- The “History Section” is each representative’s preference on how they wish to view the call tags at any given time (25 per page, and up to a week’s worth, etc.
- The “Previous Shipments” section is the place where representatives need to go to get the tag to actually save it.
- This section shows the following for each call tag:
- The date the call tag was issued (Shipped Date)
- The name of the person the call tag is for (Ship To-Company or Name)This section shows the following for each call tag:
- The tracking number for the call tag (Shipment Tracking #)
- To bring up the individual call tag for the saving purposes, representatives should click in the box next to the date the call tag was issued (as shown in the picture below)

- Then click the “Show Detail/Receipt” button for the call tag to appear.
- The “Create a Return” Shipment Details screen will appear again.
- (This looks just like the confirmation page)
- Scroll to the bottom right hand side of the screen and click on the “View/Print Receipt” button.
- The actual call tag will pop up in the system. (as seen below)

- Representatives should right click on the call tag and select the option to “Print“.
- The Print box will appear, representatives should then choose “Primo PDF” and select print. After following these steps the “Primo PDF” screen will pop up.
- Delete the link that is currently in the “Save As” line then right click in the area and hit paste.

- The “Save As” line should now be linked that looks like the following: L:\900011472\Service Order_7-18-2013.TIF
- Representatives need to change the following link:
- The TIF needs to be changed to PDF
- Delete “ServiceORder” and write in CALLTAG with Order ID Number for the order being call tagged.
- Then hit “Create PDF”
- The PDF will pop up showing the representative what it looks like in the system. If representatives go back into the RX tab and look uder “List of RX’s and ServiceOrders” (Gray area where Rx’s are)
- If a representative properly follows these instructions the link should now look like the following:
L:\900011472\CALLTAG 123456_7-18-2013.PDF
- (Please note if the “Save As” line is not completed this way “Exactly” it will not save.
- If the link is accurate representatives simply select “Create PDF”.
- A screen will pop up showing the actual call tag, which means it was saved correctly.
- Representatives should be sure print out a copy of the call tag and put it in the UPS book of returns.
TRACKING CALL TAG
- If ever a consumer needs a status on the call tag, representatives just have to go to www.ups.com and enter the tracking number of the call tag. If the information does not populate representatives must contact UPS to investigate the issue.
PUT IN A DETAILED NOTE
Representatives need to take is to put a detailed note in the system as follows:
- The “TOPIC” should always be: CALL TAG ISSUED
- The “NOTE” section should include all of the following:
- The Order ID number include the call tag was for.
- The product that we are call tagging.
- The reason why we are issuing a call tag.
- An example of what the note should look like is in the picture below:

- Please note: If something is being done (a replacement order for example) or if something needs to be done when the call tag comes back, representatives need to note that in the system.