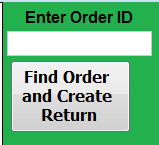
5.) Enter the order ID number in the “Enter Order ID” section.
6.) Select the “Find Order and Create Return” button (shown below):
- The return screen will populate with all of the consumer’s information.
- Verify that the correct person was brought up in the system
- If everything is accurate, continue on to the next steps.
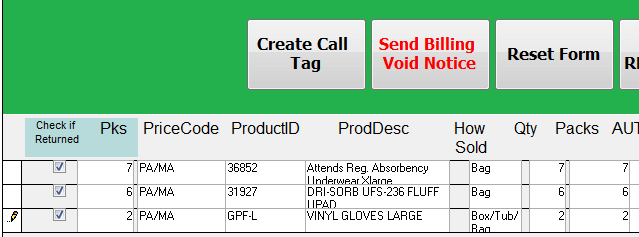
7.) Under the “Check if Returned” section, put a check in the box next to each product that is being returned.
- If whole order is being returned, check the boxes for all products with the exception of the Privacy Letter.
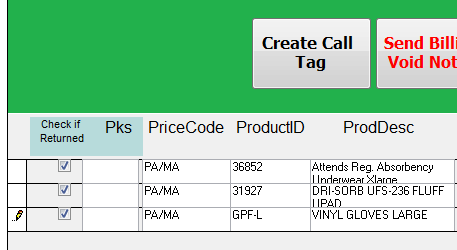
- If partial order is being returned, only check in the boxes of the products that were returned.

8.) Under the “Pks” section, enter the number of BAGS (NEVER case count) that were returned for each product.
- If partial order continue to step 8a.
- If full order read step 8h before moving on step 9.
a.) Enter the adjustment reason from the drop down box under the “AdjReason” column. The adjustment reasons representatives can choose from are listed below:
- Accidentally sent
- (CSR or Warehouse Error)
- Item Missing Order
- (Warehouse Error)
- Item Returned
- Item Never Shipped
- (Warehouse Error)
- If a not a Warehouse Error, read step 8h before moving on step 9.
- If a Warehouse Error, and a consumer received the incorrect product, representatives need to make the order accurately show what the consumer received/did not receive that month.
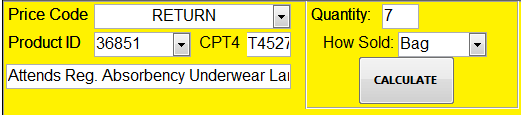
- I.) Enter the item number of the incorrect product the consumer received in the “Product ID” section.
- The CPT4 (HCPC code) and the description of the item will populate in the system.
- If no HCPC code populates the addition will not correctly add into the return.
- The CPT4 (HCPC code) and the description of the item will populate in the system.
- II.) Enter the number of product that was returned in the “Quantity” section.
- III.) Enter how the product was returned (bag, box, etc.) in the “How Sold” section.
- I.) Enter the item number of the incorrect product the consumer received in the “Product ID” section.
c.) Select “Calculate”.
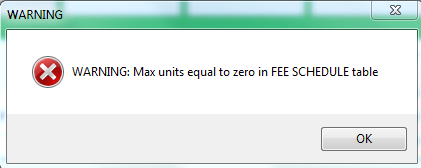
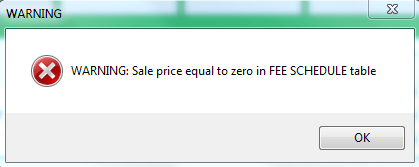
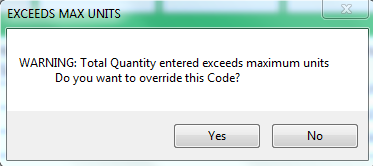
- Representatives will receive a series of “Warning” pop ups in the following order:
- Max units warning
- Sale price warning
- Exceeds Max units warning
d.) When the FIRST warning populates, click “OK”.
e.) When the SECOND warning populates, click “OK.”
f.) When the THIRD warning populates, click “OK”.
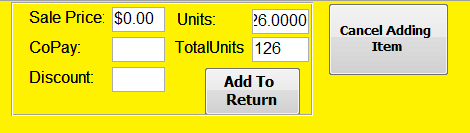
- Representatives will know that it went through correctly if the sale price populates along with the units in the system.
g.) Select the “Add to Return” button.
- Representatives should then notice that the item they entered has now been added to the order.
- If the item did NOT show up, complete the following steps:
- Enter the adjustment reason from the drop down box for the incorrect AND correct items.
- Incorrect item would be listed as “accidentally sent”.
- Correct item would be listed as “item missing from order”.
- Read step 8h before moving on step 9.
- Enter the adjustment reason from the drop down box for the incorrect AND correct items.
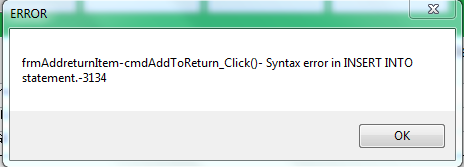
- If the item did NOT show up, and representatives received the following error they should complete the following steps:
- Notify the IT Team Lead of the issue
- Move on the step 9.
h.) Read the mistake notifications below (please note the “add to return” process is step 8a through 8g) before moving on: